# 動態組件管理
# is
這個修飾子相當特別,他的目的是,將使用這個屬性的組件替換掉,替換成指定的 Vue 組件。換句話說,只要把 Vue 組件引入後,甚至可以不需要在父層組件設定 components,就可以使用。
<template>
  <section>
    <div :is="myComponent" />
  </section>
</template>

<script>
  import HelloWorld from '@/components/HelloWorld.vue';

  export default {
    name: 'App',
    data() {
      return {
        myComponent: HelloWorld,
      };
    },
  };
</script>
2
3
4
5
6
7
8
9
10
11
12
13
14
15
16
17
18
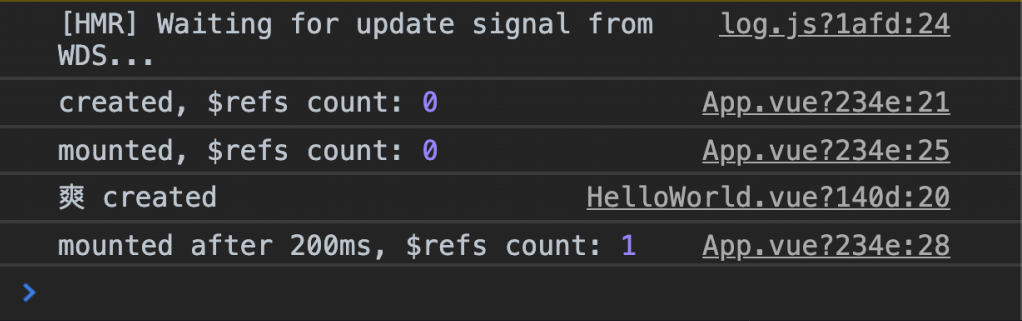
:is後面接受一個 Vue 組件實體,或者是一個非同步傳輸的 Vue 組件實體,也可以為 字串$refs如果使用:is的時候,對於mounted有些為差異:- 如果是先
import再指定,在mounted可以馬上取得該組件。 - 如果是使用 非同步載入,在
mounted必須等待200ms之後才能拿到。
- 如果是先
使用
:is的組件,整個組件會被銷毀再重建。父組件
不保證其使用:is的子組件是不是一定會在 DOM 結構樹當中。
注意
每次被 :is 載入的組件,都是被消滅然後重新建立。所以,不管呼叫幾次組件,他的 created 都會被呼叫出來。也就是說,每次的生命週期都回重新走過一遍。
所以,當在這些生命週期,甚至是組件當中,有將任何動作 綁定 到全域變數上面的,請記得把他取消,例如:
window.addEventListener('click', function () { ... }, false)
# 分頁標籤範例
  <section>
    <ul>
      <li
        v-for="tab in tabs"
        :key="tab.id"
        v-text="tab.name"
        @click.prevent="switchTab(tab.id)"
      ></li>
    </ul>
    <div :is="activiteTab">
  </section>
2
3
4
5
6
7
8
9
10
11
import Tab1 from '@/components/tab1.vue';
import Tab2 from '@/components/tab2.vue';

export default {
  name: 'App',
  data() {
    return {
      activiteTab: Tab1,
      tabs: [
        {
          id: 1,
          name: 'Tab 1',
          context: Tab1,
        },
        {
          id: 2,
          name: 'Tab 2',
          context: Tab2,
        },
      ],
    };
  },
  methods: {
    switchTab(id) {
      let index = this.tabs.findIndex((t) => t.id === id);
      if (index > -1) {
        this.activiteTab = this.tabs[index].context;
      }
    },
  },
};
2
3
4
5
6
7
8
9
10
11
12
13
14
15
16
17
18
19
20
21
22
23
24
25
26
27
28
29
30
31
# 搭配 v-for 的使用
子組件的引入
import Color from '@/components/Color.vue';
import Line from '@/components/Line.vue';
import Header from '@/components/Header.vue';
import Footer from '@/components/Footer.vue';

export default {
  components: {
    Color,
    Line,
    Header,
    Footer,
  },
};
1
2
3
4
5
6
7
8
9
10
11
12
13父組件的
componentList狀態值將引入的組件都加入至陣列中,如:['Color','Line','Header','Footer']父組件的 template 使用
v-for和is來將組件動態引入<component v-for="(item,index) in componentList" :key="index" :is="item" ></component>1
2
3
4
5編譯後的結果會像是這樣
<Color></Color>
<Line></Line>
<header></header>
<footer></footer>
1
2
3
4
# 非同步載入的 200ms
<script>
  const HelloWorld = () => ({
    component: import('@/components/HelloWorld.vue'),
  });

  export default {
    name: 'App',
    data() {
      return {
        myComponent: HelloWorld,
      };
    },
    created() {
      console.log('created, $refs count:', Object.keys(this.$refs).length);
    },
    mounted() {
      console.log('mounted, $refs count:', Object.keys(this.$refs).length);
      setTimeout(() => {
        console.log(
          'mounted after 200ms, $refs count:',
          Object.keys(this.$refs).length
        );
      }, 200);
    },
  };
</script>
2
3
4
5
6
7
8
9
10
11
12
13
14
15
16
17
18
19
20
21
22
23
24
25
26
為何是 200ms 呢?
可以參考官網的 動態載入 (opens new window)。
const HelloWorld = () => ({
  // 你需要一個返回 Promise 的 Vue 組件實體
  component: import('@/components/HelloWorld.vue'),
  // 這裡可以指定在讀取時,使用什麼 Vue 組件來呈現
  // 這個組件不可以是非同步載入
  loading: LoadingComponent,
  // 這裡可以指定在讀取錯誤時(包含超時),使用什麼 Vue 組件來呈現
  // 這個組件不可以是非同步載入
  error: ErrorComponent,
  // 預設非同步組件延遲時間,這就是 200ms 由來(預設值)
  // 如果設定為 3000,需等待 3 秒後 mounted 才會取得子組件的實體
  delay: 200,
  // 定義錯誤組件何時會顯示,預設是 Infinity
  timeout: 3000,
});
2
3
4
5
6
7
8
9
10
11
12
13
14
15
# 大量動態組件的載入
利用
computed和Promise來達成。<template> <section> <div :is="loadedComponent"></div> </section> </template> <script> export default { name: 'App', data () { return { activedComponent: 'Tab1' } }, computed: { loadedComponent () { return ((component => { return () => ({ // 因為內層會取不到組件實體,透過傳址方式,將狀態傳入 component: import('@/components/' + component + '.vue') }) })(this.activedComponent) } } } </script>1
2
3
4
5
6
7
8
9
10
11
12
13
14
15
16
17
18
19
20
21
22
23
24
25
26利用
Vue.options來達成。先來說說
options下包含了些什麼:屬性 說明 components 當前有幾個組件載入了 name 當下的組件名稱 data 當下組件所設定的預設資料集 - directives
- filters
當下組件當中是否有設定過濾器或是自定義指令 - beforeCreate
- beforeDestroy
- mounted
當下組件中,所設定過的相對應方法會出現在這些地方 render 使用的渲染函式 staticRenderFns 這個很特別,是用來作一些渲染優化或是快取的 # 實作方式
- 在
extends目錄下新增global-component.js。
import HelloKitty from '@/components/HelloKitty.vue';
import HelloWorld from '@/components/HelloWorld.vue';

Vue.component('HelloKitty', HelloKitty);
Vue.component('HelloWorld', HelloWorld);
1
2
3
4
5- 如果需要在
App.vue中引用大量組件,可以使用這種寫法。
import Vue from 'vue';

export default {
  name: 'App',
  data() {
    return {
      myComponent: 'HelloKitty',
      loadedComponent: null,
    };
  },
  created() {
    if (typeof Vue.options.components[this.myComponent] !== 'undefined') {
      this.loadedComponent = Vue.options.components[this.myComponent];
    }
  },
};
1
2
3
4
5
6
7
8
9
10
11
12
13
14
15
16- 入口的
main.js引入global-component.js。
require('./extends/global-component.js');1
來比較在
App.vue中把組件依依import進來的差異。如果按照正規的作法,應該會這樣做:
<template>
  <div id="#app">
    <header :is="headerComponent"></header>
    <main :is="mainComponent"></main>
    <footer :is="footerComponent"></footer>
  </div>
</template>
1
2
3
4
5
6
7<script>的部分:import Header0 from '@/components/header0.vue'; import Header1 from '@/components/header1.vue'; import Header2 from '@/components/header2.vue'; import Header3 from '@/components/header3.vue'; import Header4 from '@/components/header4.vue'; import Header5 from '@/components/header5.vue'; import Header6 from '@/components/header6.vue'; import Header7 from '@/components/header7.vue'; import Header8 from '@/components/header8.vue'; import Header9 from '@/components/header9.vue'; import Main0 from '@/components/main0.vue'; // 以下類推 import Footer0 from '@/components/footer0.vue'; // 以下類推1
2
3
4
5
6
7
8
9
10
11
12
13
14
15
16每次要修改,或是新增,都得改這個
App.vue才行,而在除了App.vue外也想引用上面這些組件,就必須再重寫一次,後續的維護上也相當不容易。
# 解析 DOM 模板時的注意事項
在 <ul>、<ol>、<table> 和 <select>中,盡量 勿使用 如:
<table>
  <tr-component></tr-component>
</table>
2
3
應使用,如:
<div id="app">
  <table class="table">
    <tbody>
      <tr
        v-for="(item,key) in timeData"
        :is="price-component"
        :item="item"
        :key="key"
      ></tr>
    </tbody>
  </table>
</div>
<script type="text/x-template" id="filter-component">
  <tr>
    <td>{{item.name}}</td>
    <!-- 過濾順序:currency => dollarSign -->
    <td>{{item.price|currency|dollarSign}}</td>
  </tr>
</script>
2
3
4
5
6
7
8
9
10
11
12
13
14
15
16
17
18
19
# keep-alive
<keep-alive> 這個特殊的「組件」來做快取 (cache) 保留組件當下的狀態。使用方式很簡單,只要在需要保留的組件外用 <keep-alive> 標籤包住即可:
<keep-alive>
  <component :is="currentTab"></component>
</keep-alive>
2
3
另外, <keep-alive> 除了可以搭配 :is 來使用外,也可以在 v-if 指令上搭配使用:
<keep-alive>
  <component1 v-if="a > 1"></component1>
  <component2 v-else></component2>
</keep-alive>
2
3
4
不過要注意的是,由於 <keep-alive> 同時間 只會有一個直屬的子組件被渲染,所以若是與 v-for 指令搭配使用時需要特別注意這點。
# include 、 exclude 與 max 屬性
要是切換的子組件數量太多,而我們只想針對某些子組件進行快取 (或排除某些子組件),
則可以透過 <keep-alive> 提供的 include 與 exclude 屬性來處理:
<keep-alive :include="home, about">
  <component :is="currentTab"></component>
</keep-alive>
2
3
除了逗點分隔外,也可以利用 Regular Expression 或陣列的形式:
<!-- 以 RegExp 作為 include 的條件 -->
<keep-alive :include="/(home|about)/">
  <component :is="currentTab"></component>
</keep-alive>
<!-- 以陣列作為 include 的條件 -->
<keep-alive :include="['home', 'about']">
  <component :is="currentTab"></component>
</keep-alive>
2
3
4
5
6
7
8
提醒
include 與 exclude 對應的條件為子組件的 name 屬性,而不是子組件的標籤名。
Vue.component('my-component', {
  name: 'Home-Component',
});
2
3
那麼在 include 的情況就寫成 :include="'Home-Component'" 。
為了避免組件數量過多造成的性能浪費, <keep-alive> 也提供了 max 屬性來提供開發者指定快取的組件數量:
像這樣,我們就可以透過 :max 來指定快取的子組件數量, <keep-alive> 只會保留 最後引入 的兩個子組件狀態。
而 :max 也可與前面的 :include 或 :exclude 搭配使用,提供了開發上的靈活性。
# 特殊的生命週期: activated 與 deactivated
一般切換組件時的執行順序是:
「建立新的組件」(created) → 「銷毀目前組件」(destroyed) → 「掛載新的組件」(mounted)。
如果加上 <keep-alive> 標籤,在組件首次建立時,就會先進行 created → mounted → activated 三個階段,
而當我們切換至新的組件時,則會依序執行:
「建立新的組件」(created) → 「暫停目前組件」(deactivated) → 「掛載新的組件」(mounted) → 「啟用新的組件」(activated) 這幾個階段。
倘若前面已經執行過 created 階段而未被銷毀的組件,當它再次被啟用 (activated) 的時候,也只會執行 activated hook 而不是從 created 階段重新建立它的生命週期了。