# Virtualized List

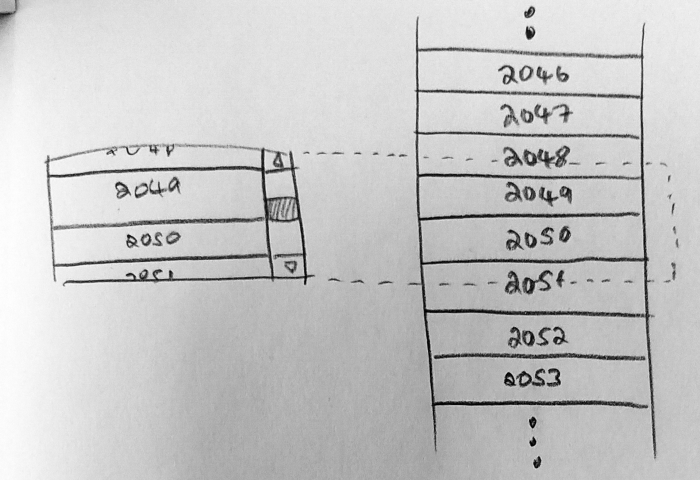
大多數虛擬化列表組件的工作方式是,不傳遞要呈現的元素列表,而是僅向列表提供我們要呈現的元素數量,每個元素的大小以及呈現單個項目的回調。
我們需要更改的第一件事是列表中元素的佈局方式。通常,我們會彼此相鄰創建許多 div,然後讓佈局引擎將它們堆疊起來,但是現在將跳過大多數元素,我們將 絕對定位每個元素,並強制將內部容器設置為正確的高度,以便滾動條仍將正確呈現。
我們可以將每個項目包裝在新的 div 中以賦予其 position 和 top 的值。但是,大多數虛擬化列表的套件,是將某些樣式傳遞給項目渲染,接著使用者需要將其應用於自己的元素。這樣會稍微複雜一些,但效率更高一點,因此我們可以來手動造輪子。
現在,有了需要顯示的項目列表,有每個項目的索引,知道這些項目有多高。我們需要計算應該可見的項目的索引。因此,要注意有下方:
innerHeight- 列表本身的總高度。它是項目高度乘以項目數scrollableAreaHeight- 可滾動區域的高度,一個可以滾動的完整列表。該高度將取決於周圍的元素scrollTop- 測量內部容器的滾動距離。它是內部容器頂部與其可見部分之間的距離
我們將元素位置轉換為元素索引,並 渲染這兩個索引之間 的所有元素:
{
  data() {
    return {
      // 全部的項目數量
      numItems: 100,
      // 項目的高度
      itemHeight: 40,
      // 可滾動的區域高度
      scrollableAreaHeight: 400,
      // 滾動條距離最上方的距離
      scrollTop: 0
    };
  },
  methods: {
    /**
     * 滾動事件
     * @param {object} e - scroll event
     */
    scrollHandler(e) {
      this.scrollTop = e.currentTarget.scrollTop;
    }
  },
  render() {
    const innerHeight = this.numItems * this.itemHeight;
    const startIndex = Math.floor(this.scrollTop / this.itemHeight);
    const endIndex = Math.min(
      this.numItems, // don't render past the end of the list
      Math.floor((this.scrollTop + this.scrollableAreaHeight) / this.itemHeight)
    );

    return(
      <div
        class="scroll"
        style={{height: `${this.scrollableAreaHeight}px`}}
        onScroll={this.scrollHandler}>
        <ul class="inner" style={{height: `${innerHeight}px`}}>
          {
            Array.from({length: (endIndex - startIndex )}, (item, index) => (
              <ItemComponent
                index={index + startIndex + 1}
                style={{
                  top: `${(index + startIndex) * this.itemHeight}px`,
                  height: `${this.itemHeight}px`,
                  lineHeight: `${this.itemHeight}px`}}>
              </ItemComponent>
            ))
          }
        </ul>
      </div>
    )
  }
}
1
2
3
4
5
6
7
8
9
10
11
12
13
14
15
16
17
18
19
20
21
22
23
24
25
26
27
28
29
30
31
32
33
34
35
36
37
38
39
40
41
42
43
44
45
46
47
48
49
50
51
52
2
3
4
5
6
7
8
9
10
11
12
13
14
15
16
17
18
19
20
21
22
23
24
25
26
27
28
29
30
31
32
33
34
35
36
37
38
39
40
41
42
43
44
45
46
47
48
49
50
51
52
下方的範例可以透過 Dev Tool 觀察,每次渲染時只顯示 10 筆資料。
試一試
- Index 1
- Index 2
- Index 3
- Index 4
- Index 5
- Index 6
- Index 7
- Index 8
- Index 9
- Index 10